Sunday, February 27, 2011

ETC_Final Project_Reflection and Video

Reflection on my RILS:

For this activity, I chose to learn about Wix and then taught it to five of my students that are participating in the PA Middle School Computer Fair.

I loved learning about Wix and so did my students!

I found that Wix was a tool that any student could dive right into and make a great website.

It allowed the students to start building sites that were informative and eye-catching.

The students that I shared this tool with are not 100% finished their final sites for the PA Middle School Computer, but I have to say that I like their chances of winning thanks to what we accomplished with Wix.

Below is my RILS Pitch Video.

I chose Option #1 (a persuasive video).

Enjoy!!


Link to video on my Viddler site:

ETC_Final Project_RILS Plan


Relevant and Innovative Learning Scenarios Planning

Creating a Flash Website With Wix!
  
1.     Target Audience -
·      Five 7th grade students that are participating in the PA Middle School Computer Fair
·      (*These students will be working in groups of two and three)

2.     Materials -
·      Two MacBook Pro laptop computers
·      Content for website creation
·      PA Middle School Computer Fair Web Page Scoring Guidelines
·      PA Middle School Computer Fair Web Page Design Category Rules
·      Internet Connection

3.     Objectives -
·      The students will be able to…
o   Describe what makes a good website.
o   Explain how the judges’ scoring rubric will be used to evaluate their web pages.
o   Create a flash website with navigation, interesting content, and media.

4.     Procedure -
·      The teacher will explain the rules for the web page category at the PA Middle School Computer Fair by looking at the PA Middle School Computer Fair website.
·      The students will be shown the PA Middle School Computer Fair Scoring Guidelines so that they understand how their project will be judged.
·      The students will gather their content(pictures, videos, information) for their websites.
·      The students will sign up for a free Wix account. (Students that do not have permission to create an account can use the teacher’s account.)
·      The students will be introduced to the Wix Flash website creator screen layout.
·      The students will learn the different tools in the Wix website creator.
·      The students will explore the different types of templates available in Wix.
·      The students will use their content to create a Flash website from a template or from scratch.
·      The students will learn how to publish their completed sites.

5.     Web 2.0 Tool -
·      Wix (http://www.wix.com/) - Create a free Flash web site

6.     Social Participation/Social Learning -
·      The students have already formed two groups to compete at the PA Middle School Computer Fair in the Web Page Design category.
·      One group has two students and the other group has three students.
·      In each group, all students will be working on all parts of this project together. They will all gather content, and they will all help create the website on Wix.
·      Students will work together during after school work sessions for the PA Middle School Computer Fair.

7.     Making Connections –
·      Connecting previous knowledge with new knowledge – The students that will be working on this project have already learned how to create simple websites with Microsoft Word and Publisher and PowerPoint. Now they will be learning one method that can be used to create a Flash website with more interactive content.
·      Creating a website and publishing it to the World Wide Web is an inherently global activity.
·      By entering their completed websites in the PA Middle School Computer Fair, the students will also get a taste of real world competition.

8.     Create/Produce –
·      The students will be creating working Flash websites.
·      These projects will be shared in two ways:
o   World Wide Web - global audience
o   PA Middle School Computer Fair – similar students in the state/judges who are industry professionals

9. Assessment –
·      I will be assessing the students’ websites using the same scoring rubric that the judges will use for the PA Middle School Computer Fair. Here is a link to that document on the Computer Fair website: http://www.middleschoolcomputerfair.org/resources/MSWebPageRubric.pdf
·     This assessment will work by comparing the students’ projects with the blocks on the rubric to see where it fits in. The goal will be to have the students’ projects match with the maximum point column on the rubric.


10.   Reflection –
·      Students – The students will reflect on their completed website by reviewing the judges comments on their scoring rubrics after the PA Middle School Computer Fair is over and the forms are mailed back to our school. I will have the students reflect by holding a formal meeting and discussion with all students that participated.
·      Me – I will be reflecting on this project on my blog. I will discuss how well the Web 2.0 tool worked for my learning audience and how well it created a real world product. I will also be commenting on the success of the project and how much the students enjoyed it.

Saturday, February 19, 2011

PE5_Wix


Part II of Practical Experience - Wix

After I named my pages and set up my basic structure, I just started adding my content.

Adding anything to the website was very easy.


On the left side of the Wix screen was a button that said “Add”. By clicking on this button, you can add text, pictures, videos, media galleries, buttons, clip art, widgets, page parts, or whatever your heart desires.


Once an item was on the page, you simply click on it to select it and change any of its properties. Wix doesn’t let you only change simple properties either! You have a great amount of control over your design and can make your site look exactly the way you want to.


Overall, I think Wix an awesome website creator! It is easy enough for a beginner to use, and it offers features that experienced website makers will love as well.

I couldn't believe how intuitive Wix was! In no time at all, I was able to create an awesome site!


Here is the link to the sample site that I made for my band to test run this Web 2.0 tool:


Have a great day!!!!

PE4_Wix


The Web 2.0 tool that I will be using for my RILS is Wix!

Wix can be found at the following web address:


Wix is a Web 2.0 tool that allows you to create your own professional-looking Flash websites very easily! You do not need to know any web code or programming. You create your site using simple drag-and-drop technology.

In order to see how Wix works, I decided to start creating a website for a ‘just for fun’ band that I am in with my brother and a couple of friends.

After creating my free account, I entered the Wix website creator.

On the first screen you see, Wix offers you a wide variety of templates that you can use (also free!).


After browsing through some of the music templates to get some ideas, I chose to start with a blank website so that I could really learn how to use all the features of the Wix website creator.


When you first enter the website creator, you are given some tips on how to start creating.


The first thing that I did when creating this site was I looked at and changed some of my site settings.


Next, I added the names of my different pages in the page manager to give the site some structure.


When I post again, I will share how I added the content to my pages.

Saturday, February 12, 2011

BP7_QuizStarCommercial

Here is my commercial for QuizStar:


Here is the link for the above video on my Viddler site:
(...just in case this embed does not work)

BP6_GameClassroomComments

Follow this link to my comments on Daniela's blog post on Game Classroom.


What a great site!


I can't wait to allow my students the chance to play the games here!


BP5_GlogsterComment

Follow this link to my comments on Brigitte's blog about Glogster.


Glogster is a great new way for students to create fascinating presentations!


Brigitte did a great job explaining the site!


BP4_QuizStar

I chose to investigate QuizStar for this activity! (I discovered this tool to create online quizzes at the Web 2.0 Guru Wiki site.)


The URL for this site is:  http://quizstar.4teachers.org/

My reason for checking out this Web 2.0 assessment tool is because I have almost 500 students and grading this many tests and quizzes can be very time consuming! Anything that can make this tedious task go even a little faster would be a serious blessing!

I started off by creating a free account.


After creating my account, I began to create my classes in the ‘Class Manager’ section.


You can give the class a title, set a quota for the number of students that may join, and list a description of the class.

Classes can be made private or public. If you choose private, then you must create student accounts (you can use a .csv file) or have them join and accept them before they can take a quiz. If you choose public, then anyone with a QuizStar account can join your class until your student quota is met and take a quiz.


Once you have a class set up, you can create a quiz.


When creating a quiz, you can give it a title, write instructions, set the number of attempts allowed by students, set feedback and incorrect answer preferences, choose when to receive results via e-mail, and also enable a timer if you would like.

Making new questions is a breeze!


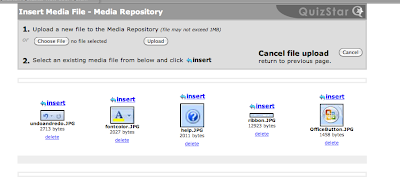
You can choose from multiple choice, true/false, or short answer. You can set the amount of points each question is worth, and you can even attach media to the question as well.


Once you have a quiz created, you can then assign it to a class.


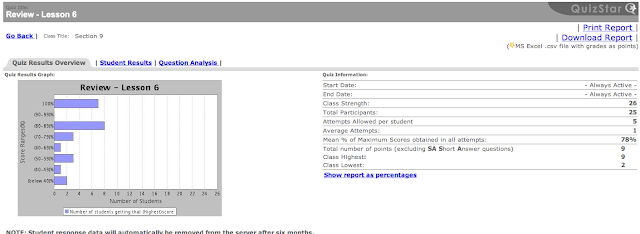
Once students have taken the quiz, you can view the results by looking at the ‘Report Manager’.


There are lots of great features on QuizStar reports. You can see an overview of the results, look at individual student results, or even look at question by question based results. Reports can be printed or downloaded.

I actually had the chance this week to try this out with a few of my 7th grade Computer Applications classes. I can’t say they loved it, but they did prefer to take a quiz this way to the traditional pen and paper way. They liked being able to see their results as soon as the quiz was over. They also liked being able to see which questions they answered incorrectly.

From the teacher perspective, I loved this Web 2.0 tool! I like how it gives the students immediate feedback. This is a crucial part of assessment that I had sometimes struggled with in the past. I also enjoyed all the time that QuizStar saved me! I was truly amazed with the detail provided by the reports that were generated, and I think that they are very easy to understand.

Overall, I find QuizStar to be a wonderful site, loaded with many great, intuitive features. For any teacher that can access computers in a lab or a laptop cart for all students, I would highly recommend this site or any similar site.


PE3_Premiere

1.     Basic Video Editing
o   Making a Rough Cut – Use the project panel to put clips in correct order and then use the ‘Automate to Sequence’ feature to quickly add clips to the timeline for the sequence.
o   Making Preliminary Edits – Clips with a lot of extra junk footage need to be trimmed before putting them into the timeline. To do this, you can make preliminary edits using the Source Monitor. To get a clip to there, you just need to double-click it in the project panel. Once you have done your preliminary edits, then you can place it on the timeline by clicking on the overlay edit button. A preliminary edit can be saved by dragging it back onto the project panel.


o   Creating Overlay and Insert Edits –


o   Using Video Layers to Add B-Roll – Video layers allow the editor to add extra footage on top of the main footage.
o   Using Ripple Edits and Ripple Delete – When you are trimming clips on the timeline, you want to make sure that you do not create any gaps in your sequence. In


o   Performing Slip Edits – A slip edit is when you keep your cut points but change what part of the clip you see in that window on the timeline.
o   Using the Razor Tool – If your clips and audio aren’t matching up the way that you expected, you can use the razor tool to split clips so that they can be moved around on the timeline and add space. The razor tool can also be used to remove unwanted sections of clips.


o   Moving Edit Points – The rolling edit tool allows you to move the edit point between clips. This can be very helpful when you have to edit to audio as well.
o   Navigating Efficiently in the Timeline – There are many different ways to navigate the timeline. I have listed these ways below. You must be very efficient at performing these operations to become a good editor.
o   Helpful Shortcuts & Terms:
o   Rough Cut – quick version where all clips are quickly added to the sequence in the correct order
o   Full Sequence View - \ (allows you to see entire sequence)
o   I – set in point
o   O – set out point
o   Shuttle – fast scrubbing in source monitor
o   Jog – slow scrubbing in source monitor
o   Overlay Edit – replaces clip form selected point with time indicator
o   Insert Edit – this will split the clip and insert the new footage between the existing clip on the timeline in the sequence.
o   A-roll – main footage, main subject
o   B-roll – extra footage
o   Command + trim (click) – Ripple Edit (allows you to trim and ripple delete all at once)
o   Slip Tool – Y
o   Razor Tool – C
o   Eye – enable/disable video track output
o   Home button – move to first frame of sequence
o   End – moves to end of program
o   Rolling Edit – N
o   Advance one frame – right arrow key
o   Go back one frame – left arrow key
o   J K L – use these keys to navigate through the timeline
9.     Creating Moving Elements
o   Using Layered Photoshop Files – You can import a Photoshop file as a sequence into your Premiere project to animate it.
o   Animating Clip Position – In the effects editor, you can adjust certain properties of the image and add key frames to animate a Photoshop file.
o   Fading Layers In and Out – This works the same as movement animation, except you just change the opacity in the effects editor.


Here is link to my Viddler account for a sample of a video I created using what I learned about Premiere. I think the best thing I have learned so far is how to animate Photoshop pictures in Premiere like I did on the intro screen for this video (HopeFilms):

http://www.viddler.com/explore/Jhughes82/videos/9/


**Important note: I plan to continue my Premiere Essential Training as I have time. 
The videos are over 5 hours in length though as compared to the 2 and a half for iMovie.

PE2_Premiere


1.     Importing and Organizing Footage
o   Setting Up a New Project – For most new users, the settings do not need to be changed when beginning a new project. When you create a Premiere project, the program only creates links to the video and other files that are needed. Because of this, you should never move your files on your computer while you are working on the project. It is a good idea to set up Premiere to autosave your project so that you do not accidentally lose your work.


o   Creating a New Sequence – Sequences are the building blocks of a project in Premiere. When creating a new sequence, you should match your preset video settings to the settings of your footage that you will be using. To create your own settings, you can select the general tab and then choose ‘Desktop’ to input your own settings.


o   Capturing and Ingesting Footage – Capturing is getting footage from a tape. Ingesting is getting footage from a file on the computer.
o   Importing Files – The media browser can be helpful in finding just the files that are needed to import. Adobe Bridge is also a great way to import footage because it allows you to preview the clips before importing.
o   Sorting and Organizing Clips – A great way to keep organized is to create bins in your project panel. One of the easiest ways is to create bins for audio, video, images, and sequences.
o   Helpful Shortcuts & Terms:
o   New Sequence
o   Capturing – footage from tape
o   Ingesting – footage from files on computer
o   Footage, Clips, and Assets are interchangeable terms
o   Import – Command+I, double-click in Project panel

PE1_Premiere

Introduction

o   These videos gave a general overview of what is possible with Adobe Premiere Pro CS5. The third introduction video explained how to use the ‘exercise files’ for this training. All the files I need to go through the Premiere Essential Training have been provided.


1.     Introductory Project
o   The Premiere Pro Workflow - This section starts by explaining the workflow for Premiere. It points out the main parts of the Premiere work area, and then explains the overall process for creating a movie project. The overall process has three major steps. The first step is to bring in clips or assets, the second step is to edit the clips, and the third step is to export to a final product.
o   Adding Footage to the Timeline - To add a clip to the timeline, you can simply drag and drop it from the project window to the timeline.


o   Understanding Timecode - Timecode is the environment in which projects are created. The current time indicator shows where you are on the timeline. Video is made up of individual frames. The time indicator on the sequence window allows you to go directly to where you want to be. It shows hours, minutes, seconds, and frames.


o   Making Basic Edits – Usually video starts recording before the director starts the action, so there will be junk footage at the beginning of a clip. This can be removed by trimming the clip. Ten seconds is a long time in the world of video editing. As an editor, you only want to show the best of the best clips.
o   Getting Familiar With the Interface – The ‘Window’ menu can be used to open and close necessary panels. The interface is completely customizable. The workspace can be reset if things get too out of control.


o   Helpful Shortcuts & Terms:
o   Spacebar – Play/Stop
o   Scrubbing – Dragging the time indicator on the timeline sequence
o   V – Selection Tool (Black Arrow)
o   Snap – On/Off
o   Maximize Panel - ~
o   Command + Click + Move – Create a floating window/panel

Monday, February 7, 2011

BP2_Wikispaces

I chose to investigate Wikispaces for this activity!

As a middle school computer teacher, I felt it was about time to get some experience using wikis. I know that many of my students use them already, so this is a way that I can potentially reach some of them in a new way.

I started off by creating my Wikispaces account, which was free for a teacher! You are given all of the features that only a premium user would normally have access to. This is awesome and saves you a lot of money as well!


Next, I set up the preferences for my wiki.

I gave it a name that would be memorable for my students, and I made sure I set it to private so that only members that I choose can view and change it.


Later on, I will be adding my students as members of the wiki and adding their accounts by using an Excel spreadsheet. This is a very convenient feature that will allow me excellent control over this aspect of the wiki.


Then, I created a few new pages for my wiki to add some navigation. I added a page for my 7th and 5th grade classes and one for my computer fair students.


After adding some pages, I made some minor changes to the look and feel of the wiki. As it grows, I plan to do some more advanced designing.


Another great feature of having a wiki is that I can post links and files for my students to easily access in school and at home, or wherever they are at for that matter. On the Computer Fair page, I added some links for the students. As this progresses, I will also add files (permission forms, etc.), links to tutorials, and samples of other projects. This will be a great resource for these students. For my 5th and 7th grade classes, I will likely keep it updated with samples, work files, and other resources that they will need for class projects and activities.


Discussion is an important part of learning, and I am hoping that the discussion pages on this wiki will help our class discussions evolve from what they currently are (getting to hear from  social students during class time) into something more open and permanent.


I know that I am a computer teacher and that this type of Web 2.0 tool will be easy to adapt to my curriculum, but I also think that teachers of any subject could find amazing uses for class wikis. From posting homework and assignments to creating useful links and discussions, wikis hold great potential for educators looking to expand a bit further into the technological realm. Just how much potential will all depend on the teacher, and how he or she will utilize it.